Setting up a home server running Ubuntu Server operating system provided a foundation for lots of cool stuff like setting up a web server. I wrote about this experience in a previous post Playing Around With Linux A Server. This post is about adding another harddisk to the server under Ubuntu Server using the command line. No easy GUI here!
This new disk with logical name /dev/sdb needs a partition table - you can tell that because Ubuntu OS helpfully tells you on the last line that it doesn't contain a valid partition table. Even if you don't know what that means it's a good pointer to go find out. This seems a good moment to mention Gparted - a GUI program to help do this stuff if you start the desktop. I used the command line instead because I wanted to learn from this process and the GUI/Desktop thing removes you from the direct, low-level experience I was looking for. Nevertheless, if you wanted to use a GUI application to partition this new HDD most people I've seen use Gparted. For command line we use fdisk /dev/sdb. The result was:
The aim is to install the new HDD as an extra data volume to expand the storage capacity of the server for possible use as a media/file server later on.
Physical Installation
Physical Installation
Physical Installation
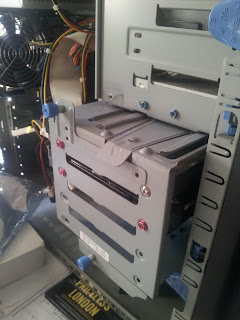
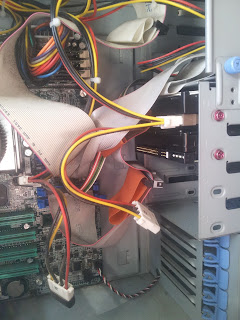
The first task was to make sure the jumper on the HDD was set appropriately to master/slave in this case the jumper was set to follow what the attached IDE cable asked for - in this case slave. Then the HDD was mounted in the carriage of the Poweredge 600SC and the data and power cables hooked up at the back. The photo to the right shows both HDDs installed in the carriage the lower one showing its connectors which left to right are IDE data, jumper, power. The cables hanging just below the HDD are IDE and power which will be connected as with the upper HDD.

Info on your new HDD
The command lshw -C disk should produce something like the following indicating that the system has recognised the new drive. I knew I only had one HDD in the box before adding this new one so it seemed logical to assume the new disk was disk:1, the later number. The vendor ID would have helped if I'd remembered to look at that on the HDD before I fitted it physically in the box.
*-disk:0
description: ATA Disk
product: ST3120022A
vendor: Seagate
physical id: 0.0.0
bus info: scsi@2:0.0.0
logical name: /dev/sda
version: 3.06
serial: 5JT0THHG
size: 111GiB (120GB)
capabilities: partitioned partitioned:dos
configuration: ansiversion=5 signature=156b156b
*-disk:1
description: ATA Disk
product: WDC WD1200BB-00R
vendor: Western Digital
physical id: 0.1.0
bus info: scsi@2:0.1.0
logical name: /dev/sdb
version: 20.0
serial: WD-WMANN1137496
size: 111GiB (120GB)
configuration: ansiversion=5
More information can be found with fdisk -l. In the result pasted below you can see 2 (or 3?) partitions on the first boot HDD (sda) and the new drive just added (sdb):
Disk /dev/sda: 120.0 GB, 120034123776 bytes
255 heads, 63 sectors/track, 14593 cylinders
Units = cylinders of 16065 * 512 = 8225280 bytes
Disk identifier: 0x156b156b
Device Boot Start End Blocks Id System
/dev/sda1 * 1 13995 112414806 83 Linux
/dev/sda2 13996 14593 4803435 5 Extended
/dev/sda5 13996 14593 4803403+ 82 Linux swap / Solaris
Disk /dev/sdb: 120.0 GB, 120034123776 bytes
255 heads, 63 sectors/track, 14593 cylinders
Units = cylinders of 16065 * 512 = 8225280 bytes
Disk identifier: 0x00000000
Disk /dev/sdb doesn't contain a valid partition table
Partitioning your HDD
With the new HDD physically installed it must be made available to the operating system. This requires the disk to be suitably partitioned and formatted. The following assume you are logged in as root (login as yourself then sudo su).
This new disk with logical name /dev/sdb needs a partition table - you can tell that because Ubuntu OS helpfully tells you on the last line that it doesn't contain a valid partition table. Even if you don't know what that means it's a good pointer to go find out. This seems a good moment to mention Gparted - a GUI program to help do this stuff if you start the desktop. I used the command line instead because I wanted to learn from this process and the GUI/Desktop thing removes you from the direct, low-level experience I was looking for. Nevertheless, if you wanted to use a GUI application to partition this new HDD most people I've seen use Gparted. For command line we use fdisk /dev/sdb. The result was:
Device contains neither a valid DOS partition table, nor Sun, SGI or OSF disklabel
Building a new DOS disklabel with disk identifier 0xc88bc777.
Changes will remain in memory only, until you decide to write them.
After that, of course, the previous content won't be recoverable.
The number of cylinders for this disk is set to 14593.
There is nothing wrong with that, but this is larger than 1024,
and could in certain setups cause problems with:
1) software that runs at boot time (e.g., old versions of LILO)
2) booting and partitioning software from other OSs
(e.g., DOS FDISK, OS/2 FDISK)
Warning: invalid flag 0x0000 of partition table 4 will be corrected by w(rite)
Command (m for help):
The first paragraph was possibly caused by this being a new HDD or a second hand one that had been cleaned. Either way this may not be seen with every HDD. The second paragraph did not raise any concerns as it was intended to mount the drive as a data volume only. Pressing m <enter> shows the list of options:
Command action
a toggle a bootable flag
b edit bsd disklabel
c toggle the dos compatibility flag
d delete a partition
l list known partition types
m print this menu
n add a new partition
o create a new empty DOS partition table
p print the partition table
q quit without saving changes
s create a new empty Sun disklabel
t change a partition's system id
u change display/entry units
v verify the partition table
w write table to disk and exit
x extra functionality (experts only)
It was hard not to look at the extra functionality (experts only) but the only useful knowledge gained from looked was that 'r' brings you back to this main menu - perhaps because I'm not an expert! Since the HDD does not contain a valid partition table the next step is to add a new partition by choosing Command 'n' add a new partition. Linux (and other OSs) only allow 4 primary partitions due to historical reasons. As HDDs grew in size people wanted to have more partitions which lead to the concept of extended partitions which can be divided into many logical partitions. FreeOS.com offers a useful description of this weirdness as does wikipedia of course.
For the purposes of learning it was decided to create two partitions on the new HDD each of 60GB, one primary and the other extended.
Command (m for help): n
Command action
e extended
p primary partition (1-4)
p
Partition number (1-4): 1
First cylinder (1-14593, default 1):
Using default value 1
Last cylinder or +size or +sizeM or +sizeK (1-14593, default 14593): 7300
Followed by
Command (m for help): n
Command action
e extended
p primary partition (1-4)
e
Partition number (1-4): 2
First cylinder (7301-14593, default 7301):
Using default value 7301
Last cylinder or +size or +sizeM or +sizeK (7301-14593, default 14593):
Using default value 14593
From the menu, 'p' lists the partitions to be created by choosing 'w' for write table to disk. This is the same information given by fdisk -l once it has been written.:
Disk /dev/sdb: 120.0 GB, 120034123776 bytes
255 heads, 63 sectors/track, 14593 cylinders
Units = cylinders of 16065 * 512 = 8225280 bytes
Disk identifier: 0xc88bc777
Device Boot Start End Blocks Id System
/dev/sdb1 1 7300 58637218+ 83 Linux
/dev/sdb2 7301 14593 58581022+ 5 Extended
Formatting your HDD
Formatting partition 1 as ext3 (best for Linux) and partition 2 as fat32 (good for Linux and Windows)
mkfs -t ext3 /dev/sdb1 worked fine and formatted the partition
mkfs -t fat32 /dev/sdb2 threw up mkfs.fat32 no such file or directory error. A post on Ubuntu Forum suggested using mkfs.vfat but this threw up mkfs.vfat: Attempting to create a too large file system. Tried using ext3 threw up:
mkfs.ext3: inode_size (128) * inodes_count (0) too big for a
filesystem with 0 blocks, specify higher inode_ratio (-i)
or lower inode count (-N).
Reading several other blogs did not give me a direct answer to this, however reading between the lines indicated that having created an Extended partition a logical partition is *required* to be able to format that partition.
Create logical partition filling up the extended partition made earlier.
root@ubuntu8:/# fdisk /dev/sdb
The number of cylinders for this disk is set to 14593.
There is nothing wrong with that, but this is larger than 1024,
and could in certain setups cause problems with:
1) software that runs at boot time (e.g., old versions of LILO)
2) booting and partitioning software from other OSs
(e.g., DOS FDISK, OS/2 FDISK)
Command (m for help): m
Command action
a toggle a bootable flag
b edit bsd disklabel
c toggle the dos compatibility flag
d delete a partition
l list known partition types
m print this menu
n add a new partition
o create a new empty DOS partition table
p print the partition table
q quit without saving changes
s create a new empty Sun disklabel
t change a partition's system id
u change display/entry units
v verify the partition table
w write table to disk and exit
x extra functionality (experts only)
Command (m for help): n
Command action
l logical (5 or over)
p primary partition (1-4)
l
First cylinder (7301-14593, default 7301):
Using default value 7301
Last cylinder or +size or +sizeM or +sizeK (7301-14593, default 14593):
Using default value 14593
Command (m for help): w
The partition table has been altered!
Calling ioctl() to re-read partition table.
Syncing disks.
Now to check the state of the disks - note that sdb5 has appeared and this also matches what was set up on my master boot disk sda
root@ubuntu8:/# fdisk -l
Disk /dev/sda: 120.0 GB, 120034123776 bytes
255 heads, 63 sectors/track, 14593 cylinders
Units = cylinders of 16065 * 512 = 8225280 bytes
Disk identifier: 0x156b156b
Device Boot Start End Blocks Id System
/dev/sda1 * 1 13995 112414806 83 Linux
/dev/sda2 13996 14593 4803435 5 Extended
/dev/sda5 13996 14593 4803403+ 82 Linux swap / Solaris
Disk /dev/sdb: 120.0 GB, 120034123776 bytes
255 heads, 63 sectors/track, 14593 cylinders
Units = cylinders of 16065 * 512 = 8225280 bytes
Disk identifier: 0xc88bc777
Device Boot Start End Blocks Id System
/dev/sdb1 1 7300 58637218+ 83 Linux
/dev/sdb2 7301 14593 58581022+ 5 Extended
/dev/sdb5 7301 14593 58580991 83 Linux
No to try to format that new partition /dev/sbd5
root@ubuntu8:/# mkfs -t fat32 /dev/sbd5
mkfs.fat32: No such file or directory
root@ubuntu8:/# mkfs -t vfat /dev/sbd5
mkfs.vfat 2.11 (12 Mar 2005)
/dev/sbd5: No such file or directory
root@ubuntu8:/# mkfs -t fat32 /dev/sdb5
mkfs.fat32: No such file or directory
root@ubuntu8:/# mkfs -t vfat /dev/sdb5
mkfs.vfat 2.11 (12 Mar 2005)
Finally looks like it works
root@ubuntu8:/# fdisk -l
Disk /dev/sda: 120.0 GB, 120034123776 bytes
255 heads, 63 sectors/track, 14593 cylinders
Units = cylinders of 16065 * 512 = 8225280 bytes
Disk identifier: 0x156b156b
Device Boot Start End Blocks Id System
/dev/sda1 * 1 13995 112414806 83 Linux
/dev/sda2 13996 14593 4803435 5 Extended
/dev/sda5 13996 14593 4803403+ 82 Linux swap / Solaris
Disk /dev/sdb: 120.0 GB, 120034123776 bytes
255 heads, 63 sectors/track, 14593 cylinders
Units = cylinders of 16065 * 512 = 8225280 bytes
Disk identifier: 0xc88bc777
Device Boot Start End Blocks Id System
/dev/sdb1 1 7300 58637218+ 83 Linux
/dev/sdb2 7301 14593 58581022+ 5 Extended
/dev/sdb5 7301 14593 58580991 83 Linux
That appears to have worked although the numbers of blocks in sdb5 doesn't seem to be right especially when you compare it to sdb2 and what's going on an sdba.
Making the drive available over the LAN and internet.
Create logical partition filling up the extended partition made earlier.
root@ubuntu8:/# fdisk /dev/sdb
The number of cylinders for this disk is set to 14593.
There is nothing wrong with that, but this is larger than 1024,
and could in certain setups cause problems with:
1) software that runs at boot time (e.g., old versions of LILO)
2) booting and partitioning software from other OSs
(e.g., DOS FDISK, OS/2 FDISK)
Command (m for help): m
Command action
a toggle a bootable flag
b edit bsd disklabel
c toggle the dos compatibility flag
d delete a partition
l list known partition types
m print this menu
n add a new partition
o create a new empty DOS partition table
p print the partition table
q quit without saving changes
s create a new empty Sun disklabel
t change a partition's system id
u change display/entry units
v verify the partition table
w write table to disk and exit
x extra functionality (experts only)
Command (m for help): n
Command action
l logical (5 or over)
p primary partition (1-4)
l
First cylinder (7301-14593, default 7301):
Using default value 7301
Last cylinder or +size or +sizeM or +sizeK (7301-14593, default 14593):
Using default value 14593
Command (m for help): w
The partition table has been altered!
Calling ioctl() to re-read partition table.
Syncing disks.
Now to check the state of the disks - note that sdb5 has appeared and this also matches what was set up on my master boot disk sda
root@ubuntu8:/# fdisk -l
Disk /dev/sda: 120.0 GB, 120034123776 bytes
255 heads, 63 sectors/track, 14593 cylinders
Units = cylinders of 16065 * 512 = 8225280 bytes
Disk identifier: 0x156b156b
Device Boot Start End Blocks Id System
/dev/sda1 * 1 13995 112414806 83 Linux
/dev/sda2 13996 14593 4803435 5 Extended
/dev/sda5 13996 14593 4803403+ 82 Linux swap / Solaris
Disk /dev/sdb: 120.0 GB, 120034123776 bytes
255 heads, 63 sectors/track, 14593 cylinders
Units = cylinders of 16065 * 512 = 8225280 bytes
Disk identifier: 0xc88bc777
Device Boot Start End Blocks Id System
/dev/sdb1 1 7300 58637218+ 83 Linux
/dev/sdb2 7301 14593 58581022+ 5 Extended
/dev/sdb5 7301 14593 58580991 83 Linux
No to try to format that new partition /dev/sbd5
root@ubuntu8:/# mkfs -t fat32 /dev/sbd5
mkfs.fat32: No such file or directory
root@ubuntu8:/# mkfs -t vfat /dev/sbd5
mkfs.vfat 2.11 (12 Mar 2005)
/dev/sbd5: No such file or directory
root@ubuntu8:/# mkfs -t fat32 /dev/sdb5
mkfs.fat32: No such file or directory
root@ubuntu8:/# mkfs -t vfat /dev/sdb5
mkfs.vfat 2.11 (12 Mar 2005)
Finally looks like it works
root@ubuntu8:/# fdisk -l
Disk /dev/sda: 120.0 GB, 120034123776 bytes
255 heads, 63 sectors/track, 14593 cylinders
Units = cylinders of 16065 * 512 = 8225280 bytes
Disk identifier: 0x156b156b
Device Boot Start End Blocks Id System
/dev/sda1 * 1 13995 112414806 83 Linux
/dev/sda2 13996 14593 4803435 5 Extended
/dev/sda5 13996 14593 4803403+ 82 Linux swap / Solaris
Disk /dev/sdb: 120.0 GB, 120034123776 bytes
255 heads, 63 sectors/track, 14593 cylinders
Units = cylinders of 16065 * 512 = 8225280 bytes
Disk identifier: 0xc88bc777
Device Boot Start End Blocks Id System
/dev/sdb1 1 7300 58637218+ 83 Linux
/dev/sdb2 7301 14593 58581022+ 5 Extended
/dev/sdb5 7301 14593 58580991 83 Linux
This is a data only HDD. The official Ubuntu advice is to reduce the amount of space reserved for root use:
tune2fs -m 1 /dev/sdb1
Next?
Mounting the drive to make it available to the operating system following another blogMaking the drive available over the LAN and internet.
No comments:
Post a Comment